We all know our basic sewing feet, well I guess we do. At least our normal sewing foot, the weird looking zipper foot that some of us most likely don’t even wanna touch just because it holds the word zipper in it 😉, the buttonhole foot and maybe some other once.
Today I would like to look at a completely different foot. Again this is one of my old blog posts that I’m moving over to my new side. Just in case you wonder that this topic looks familiar to you. Some of your machines might be already equipped with it others may not. This foot holds a little secret and this secret will help you to create a beautiful topstitch or an even and straight looking edgestitch.
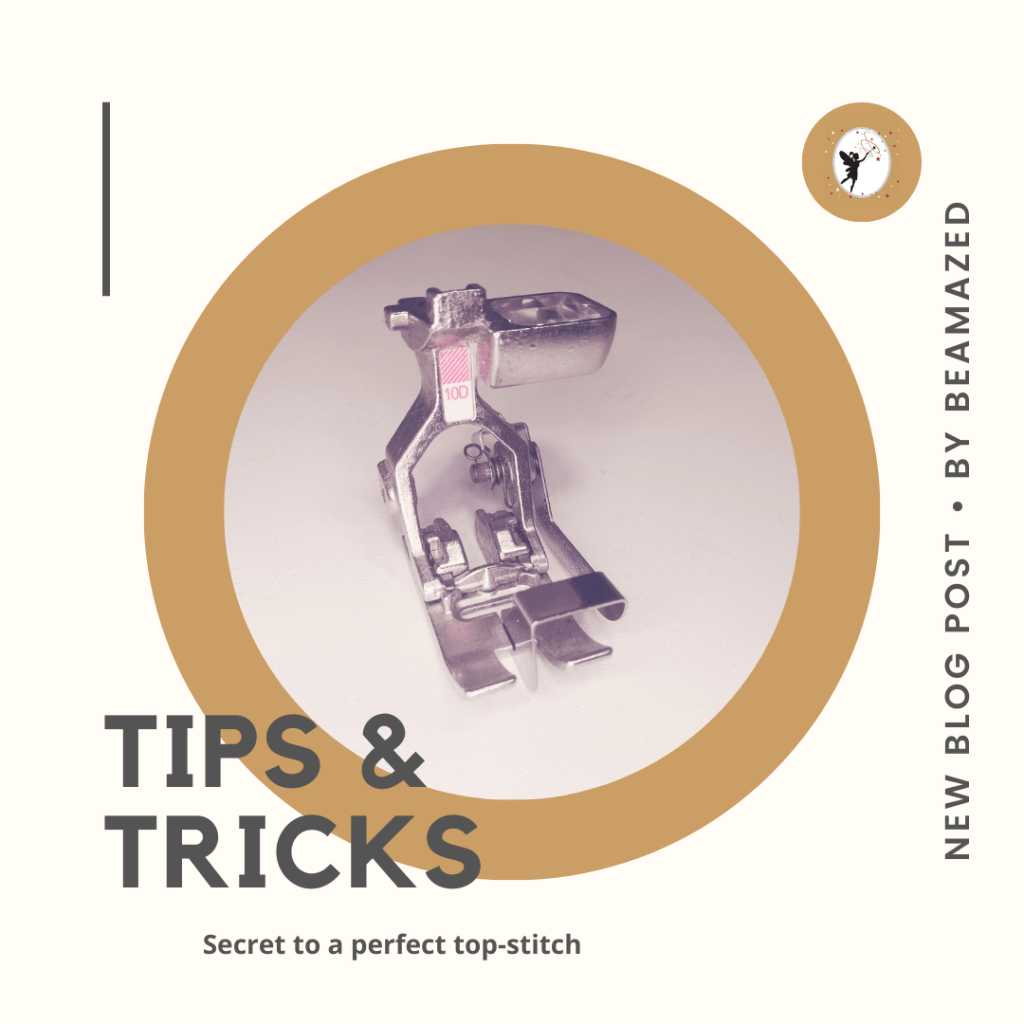
Have you ever heard of an edgestitch foot or blindstitch (aka blind hem) foot? Both of them look almost the same. They have a metal guide in the middle of the foot and while you can almost use them for the same thing they are slightly different. Here is an image of both of them.


Let’s have a closer look shall we?
First I’d like to tell you why I love this foot so much. Whenever I tried to create a topstich or any stitch close to an edge I struggled. I struggled because the seamline was not perfect, I would have these uncontrolled little bumbs in it because I accidently moved the fabric a bit while feeding it through. I know, I know handmade items don’t have to be perfect and you are absolutely right I’m completely on your side. We are not machines and if you can see an imperfection at least you know that someone made it with lots of love and compassion.
But one question was still circling through my head….how are all the seamstresses do it? Surely there must be a trick to it? One day I stumbled across these sewing feet and voi-la I can create an even feet quickly and with less fuss. This little helper has become my absolute favourite. Of course you also have to assure that you create a straight edge when folding your fabric or when creating your first seam otherwise you are following a slightly curved line but it definitely assures that you are following the edge that you would like to follow. 😉
Even my Walking foot (image below) on my Bernina QE 750 has an Edgestitch sole that I can attach if I want to and yes you are absolutely right again, it usually never comes off. 😉 I use it for any “stitch-in-the-ditch” quilting or if I quilt just along a seam line and would love to achieve an even seam right next to it.

If you would like to learn a bit more about this special foot and what exactly the difference is between the “Edgefoot” and the “Blindhem foot” please click HERE to be forwarded to a Bernina site that explains the difference clearly and with great illustrations.
For different brands the foot may look differently but they all should be designed to serve the same purpose. I just love that the metal piece in the middle is fairly long and slides nicely along the fabric edge to assure an even stitch. You will have to adjust your needle position either to the right or left depending how you are holding your fabric and where you want your stitches. On my machine I have 5 needle positions to each side but this may vary from machine to machine as well. I usually move my needle to 3 that seems perfect for me.
If you should own a Bernina with a “Dual Feet” option it even gives you a more precise sewing experience when activated. “Dual Feet” feature fits any “D-series” sewing feet.
Just test it on your machine and see what works best and how you can adjust your needle to achieve this stitch. Maybe you already have this foot in your tool box and if not it might be worth the investment depending how often you have to sew such seams and if it bothers you or not 😉
Next time you have to sew a top stitch or any edgestitch for that matter give it a go. I’m sure you are going to love it. 😊

Are you a creator who is already using these sewing feet? What is your experience, please share and comment below. I’m always interested what other’s think about it and how their experience is. 😊
Never miss a blog post!
Follow me on my journey and start your own adventure from where ever you are at the moment.
Talk to you next time and until then have a lovely day.
Sue
